Friday, April 30, 2010

SUPER Easy Yogurt Popsicles!!!

Have you seen this new yogurt???
It is great!
They are the perfect size for little tummy's...and come in several different flavors.

So I had a package that's date was coming close, and I was try to figure out how to use it...
It was sunny and warm out....
So......
I did this....

I opened all of them, put in plastic spoons.
Put them in the freezer for a few of hours.
Then I pulled them out, let them sit just a bit to loosen, and then worked the frozen Popsicles into baggies to store.

The kids LOVED them!
They are super healthy, and they will keep for at least another month now that they are frozen. (Not that they will last that long. :))

Raelyn

Tuesday, April 27, 2010

Cupcakes and Frosting

I made some wonderful cupcakes this weekend. Simple and delicious!
They were however,
Made SOOOO much more wonderful by the new "frosting" that I found HERE

I found the "frosting" on HowDoesShe, but they used it in a parfait...(which, by the way, would also be DIVINE).
Once I made it though...I thought it would be a fabulously light and wonderful frosting.
If you want a whipped type frosting, that isn't super sweet...YOU HAVE TO TRY THIS!

AND IT WAS!
Here is the recipe. (Easily doubled if more is desired....which it WILL be)
3 oz. softened cream cheese
6-8 oz. flavored yogurt (any kind would be delicious...strawberry, raspberry, blueberry etc)
2/3 cup sugar
2 tsp. lemon juice
2 cups whipped topping (like cool whip) thawed
1/4 tsp. almond extract
Hold aside the whipped topping, and beat everything else together. Beat until smooth. It will be runny, and you won't imagine it will make a fluffy frosting or filling. Add the whipped topping and continue beating until thick and smooth.
You will be amazed at how amazing this comes out to be.
It would also make a FABULOUS fruit dip at a party!
Are you drooling???????
*****************************************************
Here is the cupcake recipe I used, just in case you would like to give it a try...
((This recipe only makes about 10 cupcakes, so if you want more, just double it...))
1/2 cup sugar
1/4 cup unsalted, room temperature butter
1 egg
1 1/4 tsp vanilla (or other flavor if desired)
3/4 cup flour
1 tsp. baking powder
(just under) 1/2 cup milk
Beat the sugar and butter until it is light and fluffy. Add the egg and beat a good long time, until very light and fluffy. Add remaining ingredients and beat. Spoon evenly into cupcake lined muffin tins. Bake at 350 for about 12-14 minutes. Ovens vary, so watch your cupcakes... The tops will become golden, and they will spring when you touch them.


Raelyn

Saturday, April 24, 2010

Pirate Party Ideas

We had a pirate party for Middle's last birthday.

Just thought I would post a few ideas from it....

First we did a craft. ((I don't know why the picture isn't very good...))
I had collected paper towel, and toilet paper rolls for a long time before. I put a layer of paper mache over them with black construction paper as my material.
I bought all kinds of foam stickers, and glitter and "jewels".
I wrote their names inside and the kids went to town.
By the time they all left, they were dry and ready to take home!


I made this giant shark on a thin piece of scrap fiberboard. Much like what is put on the back of a bookshelf these days.
Hubby cut out the mouth for me after I free handed the shark.
Then I painted it!

It served two AWESOME purposes.
Originally it was to be a water balloon toss (which, by the way, was the HIT of the party)...
It also became a picture taking opportunity!
I took pictures of each child, which ended up being a part of their thank you cards.


We did a coin dig.
We buried 80 coins in the sandbox.
The kids were given paper cups, and a plastic spoon ONLY.
They were not allowed to use their hands.


X marks the spot...
I made this using foam board. I printed off the symbols from our friendly Internet.
Each child had an "X", which were from Michael's, and made of wood and felt.
I used puff paints to write all of the kids names on them.


Finally, was the pinata...that I already showed how to make.
Inside the pinata, the candy was already pre-measured and put into goodie bags, to account for different ages, and abilities.
It is hanging from our deck, and worked out SO perfectly!

I made a treasure chest cake, that I found on Family Fun's website, and I also found a version on Betty Crocker.

It is a chocolate cake, with chocolate icing.
Simply, baked in a loaf pan, letting the dome top happen naturally.
Cut open and filled with treasure-like goodies.
Then the cupcakes were meant to be "jewels".

The kids LOVED it!
As usual, the ice cream was served up in muffin liners, which is my favorite birthday party tip!!! As seen HERE.


It was a great party, and one of my favorite themes ever!
Could be changed up to meet most any age range!!!

Hope you found some ideas!


Raelyn

Tuesday, April 20, 2010

Making a Treasure box pinata #2

So...what started out as a great, cost effective, way to make a pinata for my sons birthday party...turned into HOURS upon HOURS of filthy, sticky, work...that was not only the labor of putting the thing together, but the mental, creative side that had to figure out how to put it together and make it look like the goal outcome...

I would say that when it was ALL done...I easily spent 20, spread out, hours on it. BUT, having said that...it turned out AWESOME and worked just like, if not better than, a store bought pinata.

So here, I removed the inner box...which I designed the whole thing around...this was hard, and I more-or-less had to rip and cut it out because the glue leaked through the cracks of the tin foil, but it didn't hurt the pinata...it is really strong.

Then I covered that open side with paper mache...and added 6 layers to it to make it as strong as all the other sides. Of course, letting each one dry before applying the next. You have to leave a hole in order to insert the candy. This will be covered later.


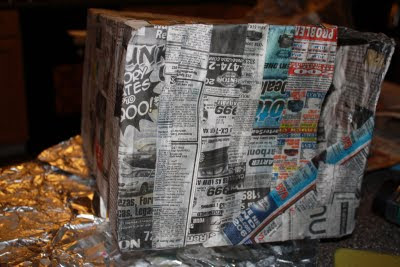
Here it is all dry...

I also made sure to remember where that hole was on the pinata...because in case it was too strong and the kids were unable to break it, I knew it would be a bit of a weak point...and a place we could easily help it break open.

So anyway, I filled it with the candy and duct taped STRONGLY the open hole.

**TIP**--I put the candy in goodie bags evenly distributed. One for each child. I didn't want anyone to be upset about not getting the same amount as anyone else. So when it broke open the bags flew out and everyone got to grab one. It worked out SOOOOOO well! These kids were all 5 and 6. The "hunt" of candy is good for older kids, I think, but the younger sets...they get too upset and frustrated, and not everyone moves at the same pace either. You could also put the actual goodie bags in the pinata, that would be kind of fun too.**

Then for the dome top...I just used posterboard, attached with duct tape.


Then I covered that with paper mache, but I only did 3 coats, as it doesn't hold any candy, and is only to finish the shape. Its structure doesn't need to be strong...plus I thought it would be funny, if the kids cracked it open and nothing came out... :)Hee Hee Hee

So, I contemplated painting it...I knew I could do that easily. I just knew there would be many bumps and imperfections that I couldn't cver.
I thought about using streamers like the pinatas at the store....but they don't make a gold or a brown streamer...
I thought about tissue paper, wrapped around the end of a pencil (totally old school) and then gluing it on (you know what I mean right??? but didn't know how I could make it look right...
so, anyway...this is what I came up with...

This is gold gift wrap tissue paper that I found at the Party Store. I cut it into strips, (thicker then I did the newspaper for macheing), and then frayed the ends.

At this time, I drilled holes to the sides in the lower, stronger part (where the candy has been added) and strung rope from one hole, through the middle, and out the other hole...in order to be hung securely from our deck...

At this point, I was kind of winging it. I didn't know how it was going to look. But, as I applied the tissue, the frayed ends, just automatically curled up...I couldn't believe it...

It took a while, but I did cover the whole thing...
I just put each row on with a little string of elmers glue.
It was messy...but easy!

And finally, it was time to put the details on...
I used streamers.
Oh...it was so good all done!!!
********
WAIT FOR IT
********
WAIT FOR IT
********
No really,
WAIT FOR IT!!!!!!
**********
*********
*******
******
*****
****
***
**
*

I was SO proud of how it came out!

I told Hubby that none of those kids better touch my pinata! :) But they did...and crushed it to shreds!

It was THE hit of the party for sure, and I was so happy with how it came out!
The MEMORIES made the time and mess and work SOOOOO worth it....
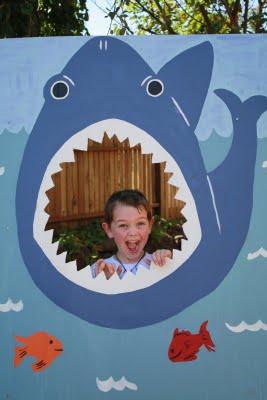
(This is Little having the first go at it.)
Would I do it again...???????
I already have next years planned out!

Raelyn

Sunday, April 18, 2010

Making a Treasure box pinata #1....

Last year, Middle's birthday party theme was PIRATES.
He wanted a pinata...

I, decided it would be "just as easy" to make a pinata from scratch.

Ummmm yeah......

So, for the brave, and those NOT afraid to make a big mess, (a big mess that has to stay around, day after day...while it dries, and needs another layer, and then dries again...etc...)

...here is the first step for a treasure box pinata....

a box...this is the foundation of the structure, which will be removed later.
cover all but ONE of the short sides in tin foil.
(the idea of the foil is to be able to pull the box out easily later...)

The glue mixture.... A LOT of it by the way.

...in the end I am betting to have gone through 14 school size bottles.... (they were the best deal at the time, or I would have gotten the big jug.
-------------------------------------------
Here are the first few layers.....
One side is left OPEN...This will be covered eventually, but it will be for candy insertion.

In the end, it will be the weakest side, so it will need some extra coats.

-------------------------------------------------
They say for a 6 year old...it need to be pretty strong, so, it needs about 6-7 coats.

IT IS EASY!!!! but VERY time consuming as you have to let EVERY layer dry before moving on to the next.
It is MESSY....and did I mention TIME CONSUMING....

More to come tomorrow...

Raelyn

Thursday, April 15, 2010

Big Baked Pretzels!

Right before Easter we tried out the pretzel recipe that I found HERE.
Infarrantly Creative is an amazing blog, by the way, in case you have never been there. She does
A-MAZING furniture re-do's, and room decor, and recipes...and she can work those power tools!
Anyway.....
I saw these pretzels and thought my kiddos would love to help with them!

I know, YUMMY, right?????
Here is the recipe that she used at Infarrantly Creative...
*1 cup+2 TBS water
*3 cups all-purpose flour (I used half all-purpose, and half wheat flour with great results!)
*3 TBS brown sugar (I used dark)
*1 1/2 tsp active dry yeast
******************************
Later.....BOIL(after the pretzels are made and being formed...)
*8 cups water
*1/2 cup baking soda

Super simple!

Little, and Middle helped me put together all of the ingredients in the bread machine. Then we set the cycle to "DOUGH"

I am sure that you could make this WITHOUT a bread machine....I would imagine that you would need to mix it well...and then knead it for a bit, then let it rise for at least an hour covered in a warm room.

When the dough cycle was done, I punched it down and kneaded it into a nice round ball.
I used a dough cutter and cut it in half, and then each half in half...I rolled those GENTLY into nice balls.
I gave each child their own ball of dough, and they went to town.

The older two, were great...
Middle made a balloon, and baseball bat, a rainbow, a soccer ball, a "T" and a pretzel (go figure) :)

Teen even enjoyed herslef...
She made a sunshine, a pretzel, a "K", a "B" and a ball

Little LOVED it, but needed some help...she kept playing and re-forming...like it was playdoh. :)
In the end, she made a heart, a snake, an "M" and a pretzel.

For the record, the dough really doesn't look that appetizing raw.

While the kids are forming, you need to boil the 8 cups of water, and 1/2 cup baking soda together. I forgot to take a picture of this step.
Once boiling, drop in, one by one, the created masterpieces for 10 seconds each!
Drain on paper towels.
Then put them on baking sheets and sprinkle with kosher salt.

Bake at 325 degrees for about 10 minutes...
When they are nice and deliciously carmel brown they are done.

Seriously.....??????? Are you drooling??????

They were really good! With a hint of a background sweetness!
YUMMY!

We will definately be making these again.....
Look how cute if you had guests over or something.....

*****One hint....In MY opinion....these are REALLY good, the first night...and OK the next day. The kids didn't mind, and they kept eating them and eating them, however...

Raelyn

Tuesday, April 13, 2010

Teacher Appreciation Gift

The last day of teacher appreciation week was the day that we decided would be gift day.

It was a neat day, because many of the kids brought in their gifts for Mrs. A...
We also had a gift we made as a class.
Our class gift to Mrs. A was a book. Each child had a page.

(This is the cover...with a poem I wrote and the class picture)
For 2 weeks prior I came in and interviewed the kids about Mrs. A. I had a series of questions, and I wrote down, word for word what they said.
It was SOOOOOOO fun! So many were just the sweetest things, that only the innocent mind of a child could put into words!

I also did handprints, and I took a class picture and had the kids all write their own name.

On each of the pages, was a picture of each child, their handprint and their interview answers.
The second page was, Robert Fulghum's All I really need to know, I learned in Kindergarten...

Here are some sample pages...


This was the back inside cover. Another class picture with goofy faces...and another little poem...
Then on that blue space, the kids were supposed to draw a little picture for her, but they all ended up writing their names again....which still turned out great!

This is the back cover. There is a pencil drawing picture (done on photoshop) just for fun. Then the Storytellers Creed...which I love!

I was so proud of the finished product...
I so loved that class!!!!!
She loved it!
*********************************

So that concludes last years teacher appreciation week..
I hope you found a little inspiration!

Raelyn

Sunday, April 11, 2010

Teacher Appreciation Gardening Basket

On day four....
We created a gardening basket.
At our school, teachers fill out a form for their room parents, which includes their hobbies, and favorites, and needs...etc... Mrs A, wrote that she loves to garden...which is why we used the theme.
All of the kids were supposed to bring in something that pertained to gardening....flowers, seeds, garden stakes, anything....

We had a big huge bucket, in Mrs A's favorite color...and we added some of the larger things...like the watering can, and sunscreen and a perennial flower with some seeds...etc.

One by one, the kids came through the door and we collected their items, and filled the bucket.

After class started...we came in and presented the bucket to her....with a little thank you speech.

She loved it, and was very touched by the thought....
The kids had ear to ear smiles....
They just loved seeing her happy!

Raelyn