Friday, April 9, 2010

Teacher Appreciation Cards

Day three was card day.
I had asked that all of the kids MAKE a card for the teacher...

Prior to that I had come in a taken some GOOFY pictures of the kiddos. Here is a tiny sampling of all of the adorable pictures I took....

They all held this sign...and made silly faces...

On their way in I added these pictures to each card that the kids gave her, that way, if anyone didn't have a card to give, they at least had their picture.

Or did a little dance...

The kids, as always, were very proud of their pictures!

Little had to get involoved too. :) She adores Middle's kindergarten teacher.

I also used these pictures for a gift for her for the end of the week...and again, added them to something at the end of the year as well.
Raelyn

Wednesday, April 7, 2010

Teacher Appreciation Bouquet

Day two was flower day for Teacher Appreciation Week.
Again sporting the gardening theme, we wanted to make our AMAZING kindergarten teacher smile...(She was 7 months prego at the time...and was still there, every single day, making our kids smarter and happier...and we SOOOOO appreciated her!)

The idea was that each child was to bring one or a few cut flowers of any kind to the teacher.
I was worried however, that many would not come with flowers and feel left out...
So I ended up going to Costco and buying a mixed bouquet, and a bouquet of her favorites...Gerber Daisies.
Then we stood out front, where the kids line up, and handed out one flower to each child.

Inside, on Mrs. A's desk was a large vase with the above tag tied on (which I made with my cricut)

They were then to go in and hand Mrs. A her flower.
Slowly, her bouquet got larger...

And larger...

The BEST part, for me, was being in the classroom. Seeing the faces of the kids.
They were SO proud of themselves.
Especially those kids, who maybe otherwise, would have had nothing to give....
It was THE best part!

Until is was finally a HUGE, beautiful, bouquet!

Just takes the time of being there early...and makes a big impact on our wonderful teachers!
Raelyn

Monday, April 5, 2010

Teacher Appreciation Door

At our school Teacher Appreciation is always at the beginning of May.
I thought I would post a few ideas that we did last year.
Last year, in kindergarten...I was my sons room mom.
We LOVED our kindergarten teacher and wanted to make sure that she had a great week!

This is what the teacher walked in to on Monday, the first day of Teacher Appreciation week.
She likes gardening, so the flowers were the start to a theme throughout the week.

I came in for a couple of weeks before T.A.W. and took pictures of the kids...and did some projects with them.
One of the things we did...was to decorate these petals. Each child got to pick their color and decorate them however they wanted.
EARLY on Monday morning, I came in and put them together on her door...(We used the inside of the door, because, for the most-part, it remains open all of the time...and if it were closed, she could see the flowers.

One of the best things though, was that the centers were empy, and I hung a pen from each flower, so that the parents could also leave notes for her.
They turned out so great!

More ideas to come!
Raelyn

Saturday, April 3, 2010

Playroom Art 1

So I have been working on a few projects for the playroom redo.
I am kind of going in the wrong order, because the biggest project I am going to undergo in here, is to REPAINT the walls. Clearly, I should do that first...but I figure, if I don't get to the painting until summer, then at least the room can look nice.
So here is a start.
{MUCH more to come...}

I bought all of the letters at Joanns.
I purposely wanted them to be mismatched and a little bit random.
The word DREAM is made of the paper mache large letters. They are about 10" high.
The "P" in PLAY and the "D" in READ are also about 10" but they are wood...
The rest of the letters are also wood, and about 7"...

I started out by spray painting them brown (matte), and then also spray painted the edges a metallic copper. I just used Krylon from Lowes. Nothing special...just liked the colors, and they went with my coordinating paper.
In the end, when they were finished, you really couldn't tell I used the metallic much at all.

I had picked scrapbook paper that would work for a boy or a girl...I decided on matching blue and pink papers, with a nice brown as the anchor.

I ModPodged the paper to the letters.
Then I cut the paper around the letters...and, once completely dry, I sanded the edges and distressed them with stain.

I am sorry...but my picture taking obviously took a backseat...usually I get MUCH better, and many more, pictures.
This kind of project has been done many times in blog land though...

I will eventually redo the "M" in DREAM....it was supposed to be done in a paper that was a combo of the pink, blue and brown...but it tore...so I had to use what I had extra of.
I still like it though...so who knows if I will get to it.

I attached the word "DREAM" to a skinny wood stick so that they would be evenly spread out. In some of the pictures you can see that stick. I have since painted it brown to match the letters.
For the other letters, I glued ribbon to the back to act as the hook, and then I hung them to the wall.

***LOVES***

**As a note....I had a horrible time getting the ModPodged paper to be bubble-free on the paper mache letters. The pictures make it look worse then it is...but there are definitely visible bubbles on the word DREAM.
I really don't know if that is avoidable, or if it is because of the material they are made from. I tried on every letter and just couldn't get it to smooth out.

**Also, The art work intertwined are paintings by my 3 kids.
I love their artwork framed...and as I complete and reveal more from the room, you will see more of it...as the underlying theme is simply going to be the KIDS....

Raelyn

Thursday, April 1, 2010

My NEW craft space!!!

I share my craft space with my kids playroom.
It is a room that has ALWAYS taken a backseat to the rest of the house.

We did paint it this ridiculous blue (which, as is usually the case, seemed completely OK at the time...) NOTE TO SELF...repaint playroom...
We have tried, really tried, to make it an organized, pleasing room...but really, it has never been right.
Needless to say, my craft space LOOKED very used, but never was.
My things sat there...trying to be organized...but really, one pile would lead to another pile, which would lead to another. There was no order.

In NO order comes chaos.
Some chaos I like, some I don't...I don't like the kind that makes my head hurt.
This kind made me NEVER want to be in that room...
let.alone.create.my.masterpieces. *insert evil laugh here*

Time to take the reigns and make it mine....
This is my OLD desk!
I forgot to take a TRUE before picture...with my monsterous piles of CRAPOLA on top!
Long ago, I loved the idea of the desk. It was from Ikea, and had a HUGE desk surface area. It had a lot of places to stack things and organize...but...
It.just.wasn't.working.

All of the drawers underneath are from Michaels. They look like they belong...but they just fit nicely underneath.
My other {storage}, and I do say that with lump in my throat :), was mismatched rubbermaid drawers etc...and was just too young...does that make sense??? I felt like I was still in college.

So, I was on a big big mission. I was on Craigslist, probably 5 times a day, everyday for a month...before I found something that I thought would be great....
Here she is.....I LOOOOOOOVE her!

I spent a RIDICULOUS amount of time in this room after we got the desk. My husband left town...and I spent my LOOOONG nights down there...just moving piles from one corner to the other. It was such a mess, and so unorganized, that I just sometimes felt like I was spinning in circles.

Eventually though, I got some order, and it started looking pretty good.

I made a little area...to hold all of my inspiration (you should see the board now)...to put some of my doo dads that need to be hung...my own inspirational "be" from the dollar spot of Michaels...and my crafting angel. :)

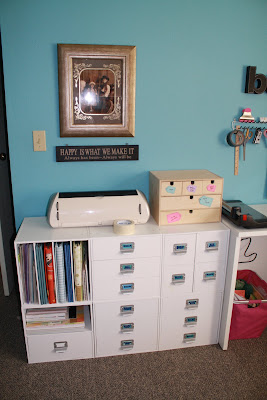
To the left of my desk are all of those drawers/paper stoarage that I got at Michaels.
They are all completely organized with stickers and stamps, tools and card making materials...
They are ALL labeled.
It is A-MAZNG!
My Cricut is ontop, with a small drawer organizer next to it...(which has my little things, like glitter, beads, and a couple of current projects....) I am still going to paint that...(I think a pop of color....)
Again...L.A.B.E.L.E.D
The hubby put up these shelves for me just a few hours before he took off for his business trip...but he put them way to high for this SHORT chica....
So I took the top two down and hung them 5 inches, each, lower.

I ADORE the way they came out! They are SO nice for storage!
They started out just being junk shelves that were in our garage collecting dust.
The hubby dug them out for me, I painted them white and we bought the cheapo brackets at Lowes.
Wait...did I say that I love them???
*************************************************
I got all of the jars at Walmart in the kitchen section. They are glass, not plastic. There are 3 different sizes.
I want to get more...I like looking at them all filled. They make me smile!
I love them!
Oh yes, didja notice????
L-A-B-E-L-E-D

The tin buckets are from the dollar spot at Target. (labeled) ;)

The tin planters are also from the dollar spot at Target...
I taped off and painted chalkboard paint labels on them.
Loves!

**(one note...The chalkboard paint DID want to lift as I took off the tape...so I just held it down at the corner, sort of like you do with vinyl...and then the rest peeled off just fine. It is obvious that I COULD just peel off the paint if I tried...but as long as you don't pick at it...it is just fine)

The "r" is a note pad...and it is from Michaels...it matches my "be"

This is how it all looks together, again.
I just like to look at it! It makes me feel so good!

Here is a look at the overall desk space.
The right side has my sewing machine...that I am just learning how to really use.
The left is for paper crafting etc...as the Cricut is over there on the end with all of my supplies.
The middle, (now) has my laptop on it.

Oh this was my "splurge" for the project. I bought it at Michaels, as it matches all of my drawers etc. I used the 40% coupon, so it wasn't that bad, I guess....
I just needed that small storage space...for all of the little things that just have no other place, but that you use all of the time....
But doesn't it look good???!

**Ahhhhhhhhhhhhhhhhhhhh** {angels sing...}

***********************************************
So just one more time.....just because it is SO fun for me!....
Before

After


**Soon to come....the REST of this room.....the PLAYROOM!
Raelyn

Wednesday, March 31, 2010

Crock Pot Chicken Tortilla Soup

I LOVE.love.LOVE to cook.
In my adult life I have grown into quite a competant home cook {if I do say so myself}...I LOVE to play in the kitchen.
I almost never COPY recipes...I lOVE to change them and make them my own...and most of the time they are off the chart Y-U-M-M-Y! I have also created many of my own...
I do happen to have a wonderful family who love to take on my constant trial and error, and that helps make me a better cook.
ANYWAY.....
Tonights dinner was just YUM...and Oh so easy!
I love me a good crockpot meal...especially on soccer nights! :)
This recipe originally came from an OLD Betty Crocker cookbook...but I altered it...many times...and have adapted it to fit a crockpot.
So here it is...


3 cups cooked chicken (we happen to love it shredded)
4 cups chicken broth
2-3 cloves of garlic
1 can light kidney beans
2 cans diced tomatoes, undrained and blended (I use a stick blender, right in the can)
1 cup of your favorite salsa (I would do less if super spicy)
1 1/2 cup frozen corn
1/2-3/4 cup fresh shredded cilantro
1 1/2 TBS ground cumin

Put everything in the crockpot together. Cover and cook on low for 8 hours...if you MUST do high...you can but it really needs at least 3 1/2 hours to come together.

TOPPINGS:
Cheese (any)
Avacado
Cilantro
Tomato
Tortilla Chips
Sour Cream

Ladle into bowl and top with all of your favorites.


*I have also added jarred sliced jalenpeno...very good...BUT remember jarred jalepenos are MUCH spicier then fresh. I only use one, or two slices...two will give it quite a kick...one just gives a hint of spice.
I know many people who love rice in their torilla soup as well, and this would be easy to do...but I would cook it first...don't put it in raw, or it will soak up a lot of the liquid.

It's really great with quesadillas.

Looks good huh?????
YUMMMMMMY

Raelyn

Tuesday, March 30, 2010

A hallway wall...

So, we live in a fairly standard split level house.
Though we have spent YEARS, literally, fixing...changing...remodeling...making it our own...it still is, will forever be...and standard split level layout.

When you come up our stairs there is a long narrow hallway.
It is one of my least favorite areas of our home. There isn't a lot that can be done, because it is, in fact, narrow.

It needed warmth...and a touch of home....
I decided to finally do a picture wall. I big huge wall of collaged pictures!
The wall looked like this....
The color is called Coconut Milk...but with nothing on the walls, it may as well be white...RIGHT?

This was my inspiration.
I DO NOT often buy things that are not clearanced, or goodwill, or garage sale...but I just loved this sign. It spoke to me.
So...I waited until it was on sale, and I bought it.
Then I centered it...and started working around it.

I thought I would just use what I already had...frame-wise. I would go for that eclectic look. I tried to make it sort of even...on each side, so that my sign stayed the focal point.

I hung each one...trying to be semi-semetrical...even though my frames were not.

Done.
I have tried to love it.
The hubby has tried to love it.
I DO love that it is done...and that there is some love on the hallway walls...
BUT
I just don't love it.
I LOVE symmetry.
I need same sized frames, and same color frames...

Eventually...
I will repaint some of my frames, and buy some new frames...
And redo my hallway wall.
But for now...
I am at least loving that it is...
DONE!

Raelyn

Monday, March 29, 2010

Little Pink Ladybug....PARTY DAY!!!!

It was finally THE DAY!!!!!

Little was SOOOO excited! There is nothing like that FIRST birthday party with their friends.

Here are the very cute girls...{we also had three boys, but they were off playing Legos at the time of the picture. :)}


The kids played dress up....

And playdoh....
In between we did crafts, but I didn't really get pictures, because I was all hands-on. :)

This age is so funny...because they all play nicely, and do a little talking to each other...but primarily, they mirror play....They play the same thing next to each other...but they don't really play it together....
For me, it is just really cute to watch.
Little happens to be quite shy too, as are many at this age...
So it ended up being a lot like a big play-date.
They all had so much fun!

As predicted...they did meander into her bedroom too...

Here is the table....
*(this is actually the table after the party...but I never got a good before with all of the chaos......)
Ahhhh I love chaos!

The snacks were a big hit....
Especially the marshmallows!

We had strawberries and blueberries, and pink marshmallows, (Valentine)colored M&Ms, Muligrain chips (because they have flax seed spots), strawberry milk, and pink dipped pretzels which there is no picture of here...

The kids were so excited and ready for some CAKE.and.ICE.CREAM!


SO, I AM GOING TO LET YOU IN ON MY FAVORITE BIRTHDAY TRICK!!!!!!!
We scoop out the ice cream before the party, and put them in individual cupcake liners, in muffin tins, and freeze them.
Then after they are re-hardened...you can either leave them in the muffin tin, or you can put them in a rubbermaid or even a ziplock bag...
Either way...all you have to do is grab and give to each child, rather then scoop...make them wait...and make a mess!
LOVE.IT! SO.SO.EASY!


Here are the cupcakes...
Next to the birthday girl...they were the STAR of the party! :)
They turned out SO cute.

Boxed cake mix...Cherry Chip.
I made pink frosting and chocolate frosting.
So simple to decorate...

On the top cupcake...just for some character, I unwrapped the cupcake and frosted the whole thing like a little cake...then I decorated it fully, rather then just the top.


The whole day was great...
Because of the number of kids, it was just super calm, and there was lots of room...and everyone got along.
It was a really great day.
Little had a wonderful time....and after all...
That is the reason I ultimately put in all of the time that I put in....
To make my Little happy!

Raelyn